
Packs
Bundle one or more listings into a pack to sell them at once as a group.

Overview
While you can sell individual listings, Packs allow you to bundle one or more of your listings to sell as a group. Packs are like traditional trading card packs, but since these are digital, you can use accompanying videos or animations to simulate opening a package for your collectors. Users can open them to reveal a random listing according to the rarity of parameters you define.
How Packs Work
When you create a pack to sell on the blockchain, users can open them to reveal one or more random listings according to the rarity of parameters you define. Packs will randomize across all editions in the collection that you add to it. Packs themselves are an off-chain concept for hiding the listing's content until after a collector purchases them. Once they complete the purchase and go through the reveal process, the listings are then transferred to their wallet.
Step 1: Create New Pack
- Go to NFTs > Packs and click the Create New button.
- Click Add NFT and click the listings you'd like to add to the Pack. You’ll see a checkmark next to your selected listings in the NFTs Included section above. To remove a listing, click on the X
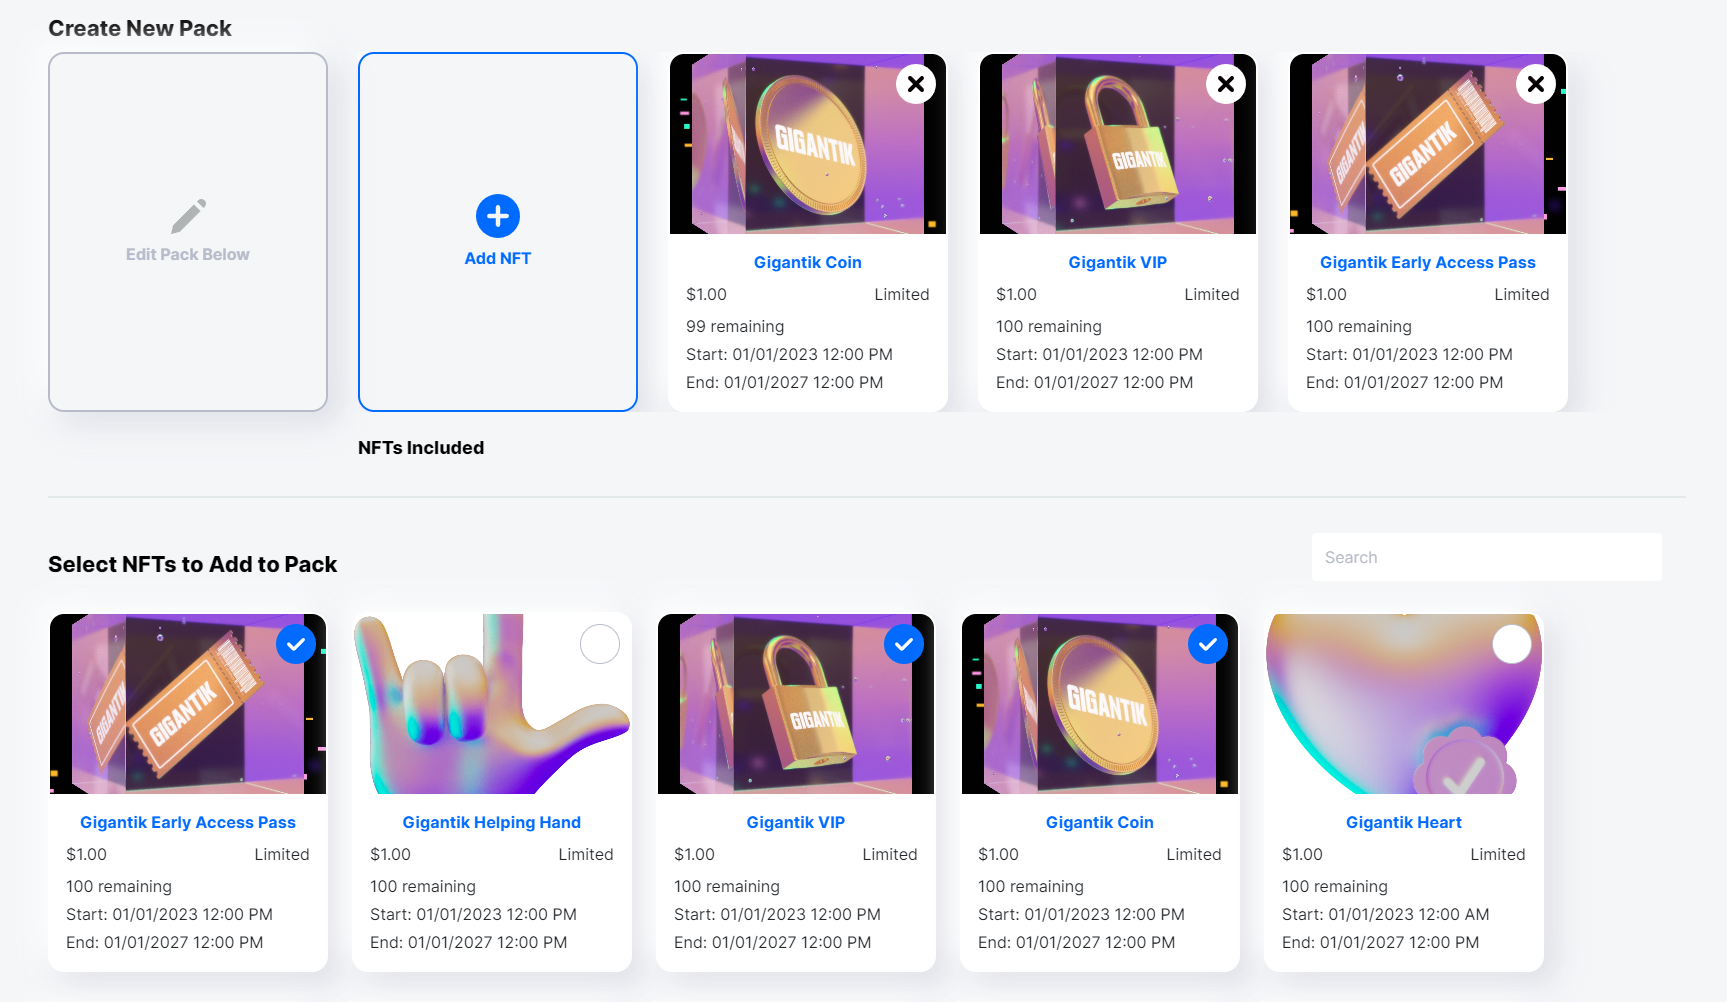
Selecting Listings for the Pack
Next, click the listings you want to add to the pack. You’ll see a checkmark next to your selected NFT in the NFTs Included section above. To remove an NFT, click on the X.
Note
In order to add listings to a pack, they need to be set to Inactive.
Step 2: Enter Pack Information
To edit your pack information, clickEdit Pack Below. If you click the Back button you will be taken to the main packs page.

- Enter a unique Name of your pack.
- Enter the Quantity of packs to create.
- Enter the Number of NFTs per Pack.
- Enter a pack Description. Additionally, you can select Preview to see how your description will look to the collectors on the front end.

- Enter a Price (USD).
- Complete the date fields. Note that all dates default to midnight of the following day, and the time is localized to your timezone based on your browser’s settings.
- Publish Date: The date the pack is visible in the Marketplace.
- Sale Start Date: The date the pack is purchasable in the Marketplace.
- Sale End Date: The date the pack is no longer available to purchase.
- Set the Product Status to Active or Inactive to determine if a Pack is visible or not in the Marketplace.
- Optional: Include Tags.
- Optional: Add Badges.
- Note that you have to create badges in the Marketplace> Content settings first before you can upload them to a pack.

Step 3: Upload an Image, Video, or 3D Model

- Click into the Image / Video / 3D Model box to upload a supported file type from your computer. You can also add a file by dragging and dropping it into the area.
- Optional: Select the Use Different Preview Image checkbox if you want to add a different image to display before the listing.
- Optional: Click the Reveal Video toggle to upload an accompanying video for collectors when opening the pack. You can add a Custom Reveal Video or a Default Reveal Video that you previously defined in your Marketplace Content settings.
- Optional: Click the Background Video toggle to upload a background video for collectors when opening the pack. Background videos are typically used for audio. You can add a Custom Background Video or a Default Background Video that you previously defined in your Marketplace Content settings.
- Optional: Click the Show Edition Number on Pack Reveal checkbox to display the edition number when collectors open a pack.
Adding a Different Preview Image
When you add a different preview image, it appears on the listing card on the homepage (if featured) and on marketplaces. The main image will show up on the listing detail page.
Optional: Configure Advanced Settings

Pack Advanced Settings
- Click Show Advanced Settings.
- Select the Enforce purchase limit checkbox to cap the number of tokens of a listing or packs purchasable for any specific wallet address.
Step 4: Finish Creating the Pack
Once all the details have been set for the pack, it’s time to create it! First, click the Create button to bring up the dialog pop-up asking if you’re sure you want to create the pack. Then, once you’ve checked that all your information is accurate, click Create in the pop-up menu.
Pack Profile
To set guaranteed pack odds, reach out to [email protected] for assistance with creating a pack profile for your pack.
Step 5: Filling your Pack
Note
You can only include inactive listings in the pack; otherwise, you’ll receive an error when filling the pack. To set a listing to inactive, go to the Listings page, click on the applicable listing, and change the Product Status to Inactive. Click Save Changes when finished.

The final step to adding the pack to the Marketplace is to fill it. Filling the pack consist of randomizing the included listings to add to the pack. To fill the pack, go to NFTs > Packs and click Fill now in the Status column. Remember to ensure that the listings you want to add to the pack are inactive. The pack will not appear in the Marketplace until you fill it.
Updated 10 months ago