
Open Edition
Sell an unlimited number of NFTs.

Overview
With Open Edition listings, you can create NFTs without a predefined quantity.
Minting
In this section, you’ll enter the minting information for your Open Edition Listing. This information is written to the blockchain and includes your digital file, name, description, price, and other metadata associated with your token.

Step 1: Add description details
- From the Listings page, click the Create New button.
- If you’ve already created a Series, choose an existing one from the dropdown list. Otherwise, select Create New Series and enter a Series name and Series Description.
- Enter your NFT Name and a Description.
- Enter a Creator Name and Creator URL in the applicable fields.
- Optional: Collector Points allow your users to collect points when they purchase NFTs. In the Collector Points field, enter a number to assign a point value to the NFT. You can also use the up/down arrows in the field to increase or decrease the point value.
Note: Traits and Metadata Attributes
You can only create new traits at the series level and not on each individual listing. However, once you create a set of traits and values for a series, you can then assign those traits to individual listings. See the Traits and Metadata guide for more information.
Step 2: Upload an image, video, or 3D Model

- Click into the Image / Video / 3D Model box to upload a supported file type from your computer. You can also add a file by dragging and dropping it into the area.
- Optional: Select the Use Different Preview Image. checkbox if you want to add a different image to display before the listing.
- Optional: To add NFT Traits and Additional Metadata to your listing, click the NFT Traits and Additional Metadata buttons to select from a list of options. Note that you should set up Traits and Metadata Trait Management before creating a new listing.
- Optional: From the Additional Images section, you can add additional images to your NFT. Note that any other images you add will appear on the Listings page.
Adding a Different Preview Image
When you add a different preview image, it appears on the listing card on the homepage (if featured) and on marketplaces. The main image will show up on the listing detail page. Maybe a screenshot will make it more clear
Listing
In this section, you’ll enter all your off-chain data for your Limited listing. You can go back and edit this information even after minting your NFT. However, you cannot change the Listing Type.
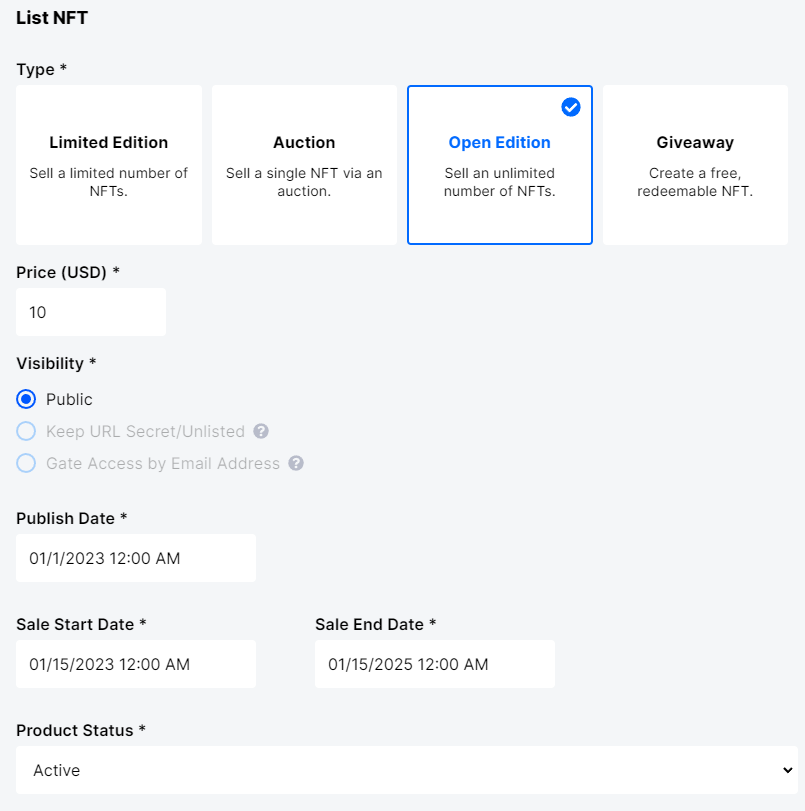
Open Edition NFT Type Selected
Step 3: Fill out your NFT Listing Details
- Select Open Edition for your NFT Type.
- Set the NFT Price (USD). Note that if you set the price to 0, the NFT instead becomes a free Giveaway listing and the collector will see the Redeem button instead of Buy. However, similar to a Giveaway, Open Editions are minted on demand.
- Set the Visibility option for your NFT:
- Public: Makes your NFT visible to everyone.
- Gate Access by Email Address: Provide access to select users by entering their email addresses in a comma-separated list
- Complete the date fields. Note that all dates default to midnight of the following day and the time is localized to your timezone based on your browser’s settings.
- Publish Date: The date the NFT is visible in the marketplace
- Sale Start Date: The date the NFT is purchasable in the marketplace
- Sale End Date: The NFT is no longer available to purchase
- Set the Product Status to Active or Inactive to determine if an NFT is visible or not in the marketplace.
- Optional: Include Tags.
- Optional: Add Badges. Note that you have to create badges in the Marketplace > Content settings first before you can upload them to a listing.
Optional: Configure Advanced Settings
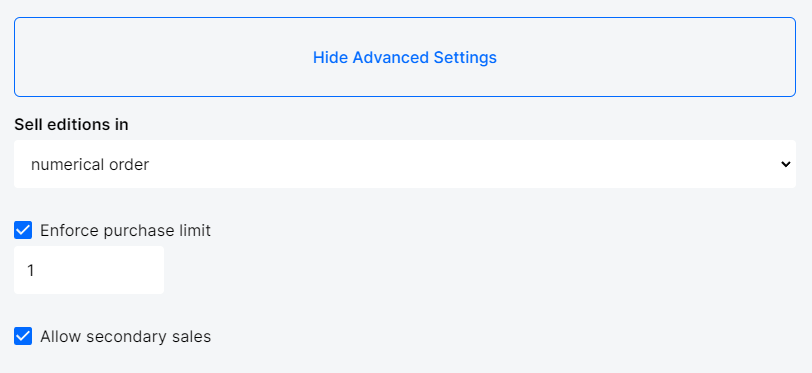
Advanced Settings for Open Edition
- Click Show Advanced Settings.
- From the Sell edition in the dropdown menu, choose numerical order or random order.
- Numerical: The first person to purchase the NFT receives edition #1, and the second person receives edition #2, etc.
- Random: The first person to purchase gets a randomly selected edition from the max quantity minted. For example, if you mint 100,000 NFTs, the first minted token could be #1,000 of the 100,000.
- Select the Enforce purchase limit checkbox to cap the number of tokens of a listing or packs purchasable for any specific wallet address.
- Select the Allow Secondary Sales checkbox if you'd like for this NFT to be sellable on the secondary marketplace.
- If the checkbox is unchecked, collectors will not be able to list it in the secondary marketplace.
Updating Unlockable Content
You can update Unlockable Content anytime even after the NFT has been sold.
About Unlockable Content
You can use the Unlockable Content feature to give access to content to collectors who own a specific NFT. There are various types of unlockable content use cases, including but not limited to discount coupons, event links, videos, or even a higher resolution image of the NFT.
Step 4: Save your Listing
Since Open Editions aren’t minted until a collector purchases the listing, click the Save button to create your NFT. You’ll see a pop-up asking if you’re sure you want to create the NFT. Once you’ve checked that all of your information is accurate, click Create in the pop-up menu.
Updated 10 months ago