
Add Google OpenID Connect for your marketplace
Overview
This article provides step-by-step instructions on configuring Google Cloud Developer Console with your Gigantik marketplace. OIDC authentication allows collectors to securely authenticate and access your Gigantik Marketplace using their existing Google accounts.
Prerequisites:
To proceed with the instructions, you will need the following:
- A valid Google Cloud Developer Console account
- Access to the Gigantik CMS
Accessing the Google Cloud Developer Console
- Open your web browser and navigate to the Google Cloud Developer Console website.
- Sign in with your Google account credentials.
- Once logged in, locate and click on APIs & Services in the left-hand menu.
Creating OAuth Client ID
- Once in the APIs & Services dashboard, click on Credentials.
- If you do not yet have a project, click Create New Project and enter relevant details.
- Once a project has been created, click on the Create Credentials button and select OAuth Client ID from the dropdown menu.

OAuth Client ID in Google Cloud
- Choose Web Application as the Application Type.
- Provide a name for your OAuth Client ID.
- Under the Authorized Redirect URIs section, enter the root of your marketplace URL, including the trailing slash. For example, enter "https://example.shops.gigantik.io/"
- Click Save to create the OAuth Client ID.
- Make a note of the provided Client ID, as you will need it in the next steps.
This process may change based on decisions at Google. Please see the official documentation:
https://developers.google.com/identity/gsi/web/guides/get-google-api-clientid
Configuring the OIDC Provider in the Gigantik CMS
- Log in to the Gigantik CMS
- Navigate to Marketplace > OpenID Connect

The OpenID Connect Integration in the CMS
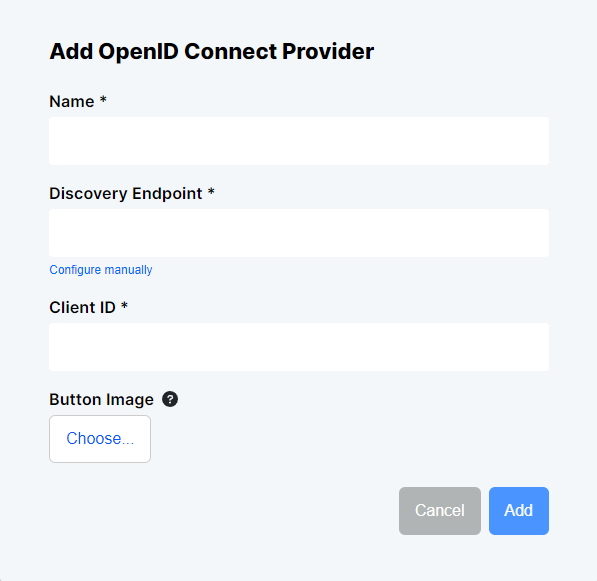
- At the top right of the Open ID Connect screen, click the Add OpenID Connect Provider button
- Provide a name for the OIDC provider (e.g. "Google").
- In the Discovery Endpoint field, enter "https://accounts.google.com/.well-known/openid-configuration"
- In the Client ID field, enter the Client ID obtained from Creating OAuth Client ID, specifically Step 8.
- Optionally, you may provide a button image for the OIDC Provider to enhance the user interface.
OpenID Setup in the CMS
- Save the configuration settings.
Conclusion:
By following the steps outlined in this article, you should now have successfully set up OIDC authentication for your Gigantik Marketplace using Google as the identity provider. With this setup, collectors can now authenticate securely and access your Gigantik marketplace using their Google credentials.
For further information about advanced configuration options, refer to the official Google documentation.
Updated over 1 year ago